Quick Start
This guide will help you quickly deploy and run the Open-LLM-VTuber project.
The configuration deployed in this guide is Ollama + sherpa-onnx-asr (SenseVoiceSmall) + edge_tts. For in-depth customization, please refer to the relevant sections in the User Guide.
If you replace Ollama with OpenAI Compatible and sherpa-onnx-asr (SenseVoiceSmall) with groq_whisper_asr, you only need to configure the API Key to use it. There is no need to download model files, and you can skip configuring the local GPU.
This project only recommends using Chrome. Known issues exist with browsers like Edge and Safari.
If you are located in mainland China, it is recommended to enable a proxy before deploying and using this project to ensure that all resources can be downloaded smoothly.
If you encounter an issue where local services (ollama, deeplx, gptsovits) cannot be accessed after enabling the proxy but can be accessed after disabling the proxy, please ensure that your proxy bypasses local addresses (localhost), or close the proxy after all resources are downloaded before running this project. For more information, refer to Setting Proxy Bypass.
Groq Whisper API, OpenAI API, and other foreign large model/inference platform APIs generally cannot use proxies from Hong Kong.
Device Requirements
Minimum Requirements
Most of the heavy components (ASR, LLM, TTS, and translation) of this project can be chosen to use APIs instead of local computing, allowing you to choose which components you wish to run locally while using APIs for those that your local system cannot handle.
Therefore, the minimum device requirements for this project are:
- A computer
- A Raspberry Pi as well if you insist
Recommended Device Requirements for Local Operation
- Mac with M series chip
- Nvidia GPU
- Newer AMD GPU (great if it supports ROCm)
- Other GPUs
- Or a CPU powerful enough to substitute for a GPU
This project supports various backends for speech recognition (ASR), large language models (LLM), and text-to-speech (TTS). Please choose wisely according to your hardware capabilities. If you find the operation too slow, please select smaller models or use APIs.
For the components selected in this quick start guide, you will need a CPU with normal speed (for ASR), a GPU supported by Ollama (for LLM), and an internet connection (for TTS).
Environment Preparation
Install Git
- Windows
- macOS
- Linux
# Run in the command line
winget install Git.Git
Regarding winget
If you are using an older version of Windows (prior to Windows 11 (21H2)), your computer may not have the winget package manager built-in. You can search for and download winget from the Microsoft Store.
If you are using a version before Windows 10 1809 (build 17763), your computer may not support winget. Please visit the Git official website to download and install Git. For ffmpeg, please search online for ffmpeg installation guides.
# If Homebrew is not installed, please run this command to install it, or refer to https://brew.sh/zh-cn/ for installation
/bin/bash -c "$(curl -fsSL https://raw.githubusercontent.com/Homebrew/install/HEAD/install.sh)"
# Install Git
brew install git
# Ubuntu/Debian
sudo apt install git

# CentOS/RHEL
sudo dnf install git
Install FFmpeg
FFmpeg is a required dependency. Without FFmpeg, errors related to missing audio files will occur.
- Windows
- macOS
- Linux
# Run in the command line
winget install ffmpeg
# If Homebrew is not installed, please run this command to install it, or refer to https://brew.sh/zh-cn/ for installation
/bin/bash -c "$(curl -fsSL https://raw.githubusercontent.com/Homebrew/install/HEAD/install.sh)"
# Install ffmpeg
brew install ffmpeg
# Ubuntu/Debian
sudo apt install ffmpeg

# CentOS/RHEL
sudo dnf install ffmpeg
Verify ffmpeg installation
Run the following command in the command line:
ffmpeg -version
If you see text similar to:
ffmpeg version 7.1 Copyright (c) 2000-2024 the FFmpeg developers
...(followed by a long string of text)
it indicates that you have successfully installed ffmpeg.
NVIDIA GPU Support
If you have an NVIDIA GPU and want to use it to run local models, you need to:
- Install NVIDIA GPU drivers
- Install CUDA Toolkit (recommended version 11.8 or higher)
- Install the corresponding version of cuDNN
Windows Installation Steps:
The following paths are for reference only and need to be modified according to the version and actual installation path.
-
Check GPU Driver Version
- Right-click on the desktop and select "NVIDIA Control Panel"
- Help -> System Information -> Components, check the driver version
- Or visit the NVIDIA Driver Download Page to download the latest driver
-
Install CUDA Toolkit
- Visit CUDA Version Compatibility to check the CUDA version supported by your driver version
- Visit the CUDA Toolkit Download Page to download the corresponding version
- After installation, add the following paths to the system environment variable PATH:
C:\NVIDIA GPU Computing Toolkit\CUDA\v<version>\bin
C:\NVIDIA GPU Computing Toolkit\CUDA\v<version>\lib\x64
-
Install cuDNN
- Visit the cuDNN Download Page (requires an NVIDIA account)
- Download the cuDNN version that matches your CUDA version
- After extracting, copy the files to the CUDA installation directory:
- Copy files from
cuda/bintoC:\Program Files\NVIDIA GPU Computing Toolkit\CUDA\v<version>\bin - Copy files from
cuda/includetoC:\Program Files\NVIDIA GPU Computing Toolkit\CUDA\v<version>\include - Copy files from
cuda/lib/x64toC:\Program Files\NVIDIA GPU Computing Toolkit\CUDA\v<version>\lib\x64
- Copy files from
Verify Installation:
- Check driver installation:
nvidia-smi
- Check CUDA installation:
nvcc --version
Python Environment Management
Starting from version v1.0.0, we recommend using uv as the dependency management tool.
If you prefer to use conda, venv, or something similar, you can them as well. Starting from v1.2.0, the project is fully compatible with standard pip installation methods.
Guidelines and Notes on using pip and conda
Details
uv is the dependency management tool for this project, and I recommend using uv.
conda, pip, and other dependency management tools can also be used, but we will not test these tools nor answer questions arising from their use (because before v1.0.0 we used conda, and we received a significant number of Python-related questions).
If you absolutely must use them, please pay close attention to issues like the Python version and the Python executable used by the virtual environment. Before migrating to uv, many, many people encountered various problems.
Ensure your Python version is >= 3.10 and < 3.13. I am not sure about the current version's compatibility with 3.13, but you can try it.
Installing project dependencies using pip
(Added in project version
v1.2.0)
pip install -r requirements.txt
- This
requirements.txtis automatically generated from thepyproject.tomlfile and might pin dependencies quite strictly. If issues arise, you can refer to the dependency versions declared inpyproject.tomland loosen the constraints yourself. Alternatively, switch to using uv or another tool that supports declaring dependencies viapyproject.toml.
Or
pip install -e .
- This command installs dependencies using the pyproject.toml file, but it also installs the project itself into the environment in editable mode. I suspect this might cause issues during project updates, but I'm not certain.
Then run the project
python run_server.py
Afterward, any uv add or uv remove commands mentioned in the documentation can be directly replaced with pip install, pip uninstall, etc.
conda
- In the current directory, create a conda environment
conda create -p "./.conda" python=3.10.6
- Activate this conda environment
conda activate ./.conda
- Use pip to install project dependencies
pip install -r requirements.txt
- Run the project
python run_server.py
Afterward, any uv add or uv remove commands mentioned in the documentation can be directly replaced with pip install, pip uninstall, etc.
- Windows
- macOS/Linux
# Method 1: PowerShell
powershell -ExecutionPolicy ByPass -c "irm https://astral.sh/uv/install.ps1 | iex"

# Method 2: winget
winget install --id=astral-sh.uv -e

# Important: For winget, please restart the command line / IDE after installation
# Method 1:  curl
curl -LsSf https://astral.sh/uv/install.sh | sh
# Or run wget -qO- https://astral.sh/uv/install.sh | sh if curl is not available on your computer

# Method 2: homebrew (if installed)
brew install uv

# Important: After installation, please run the following command to reload the configuration file, or restart the command line / IDE
source ~/.bashrc  # If using bash
# Or
source ~/.zshrc   # If using zsh
For winget, curl or weget, you need to restart the command line / IDE or reload the configuration file after installing uv
For more uv installation methods, refer to: Installing uv
Deployment Guide
1. Get the Project Code
We need to download the project code. There are two methods to acquire the project code.
Please place the project in a suitable location, ensuring the path does not contain Chinese characters.
For example, a path like D:\新建文件夹\Open-LLM=VTuber might cause errors. Please ensure the path consists only of English characters.
- Download Stable Release from GitHub
- Git Command Pull
- Don't download the ZIP from the Code button
Go to our Release page and download the ZIP file that looks like Open-LLM-VTuber-v1.x.x.zip from the release page.
Note that you need to download from the Release Page, NOT the "Download ZIP" option from the "Code" button on the GitHub main page. Don't do that!
If you want Desktop Pet Mode or desktop client version, you can also download files starting with open-llm-vtuber-electron - Windows users download the exe file, while the macOS users download the dmg file. This desktop client can launch Pet Mode after you configured backend and successfully start the backend server.
Ensure stable network connection when using Git. Mainland China users may need to use a proxy.
The --recursive flag is REQUIRED for the git clone command.
This is because, starting from v1.0.0, frontend code (user interface) has been moved to a separate repository. We've established build workflows and linked frontend code via git submodule to the frontend directory. Adding the --recursive flag is therefore required in git clone command. Without the --recursive flag, you will run into the problem that the web displays "Detail: Not found"
# Clone repository / Download latest Github Release
git clone https://github.com/Open-LLM-VTuber/Open-LLM-VTuber --recursive

# Enter project directory
cd Open-LLM-VTuber
For Desktop Pet Mode or desktop client, visit Open-LLM-VTuber-Web Releases and download open-llm-vtuber-electron files - Windows users download the exe file, while the macOS users download the dmg file. This desktop client can launch Pet Mode after you configured backend and successfully start the backend server.
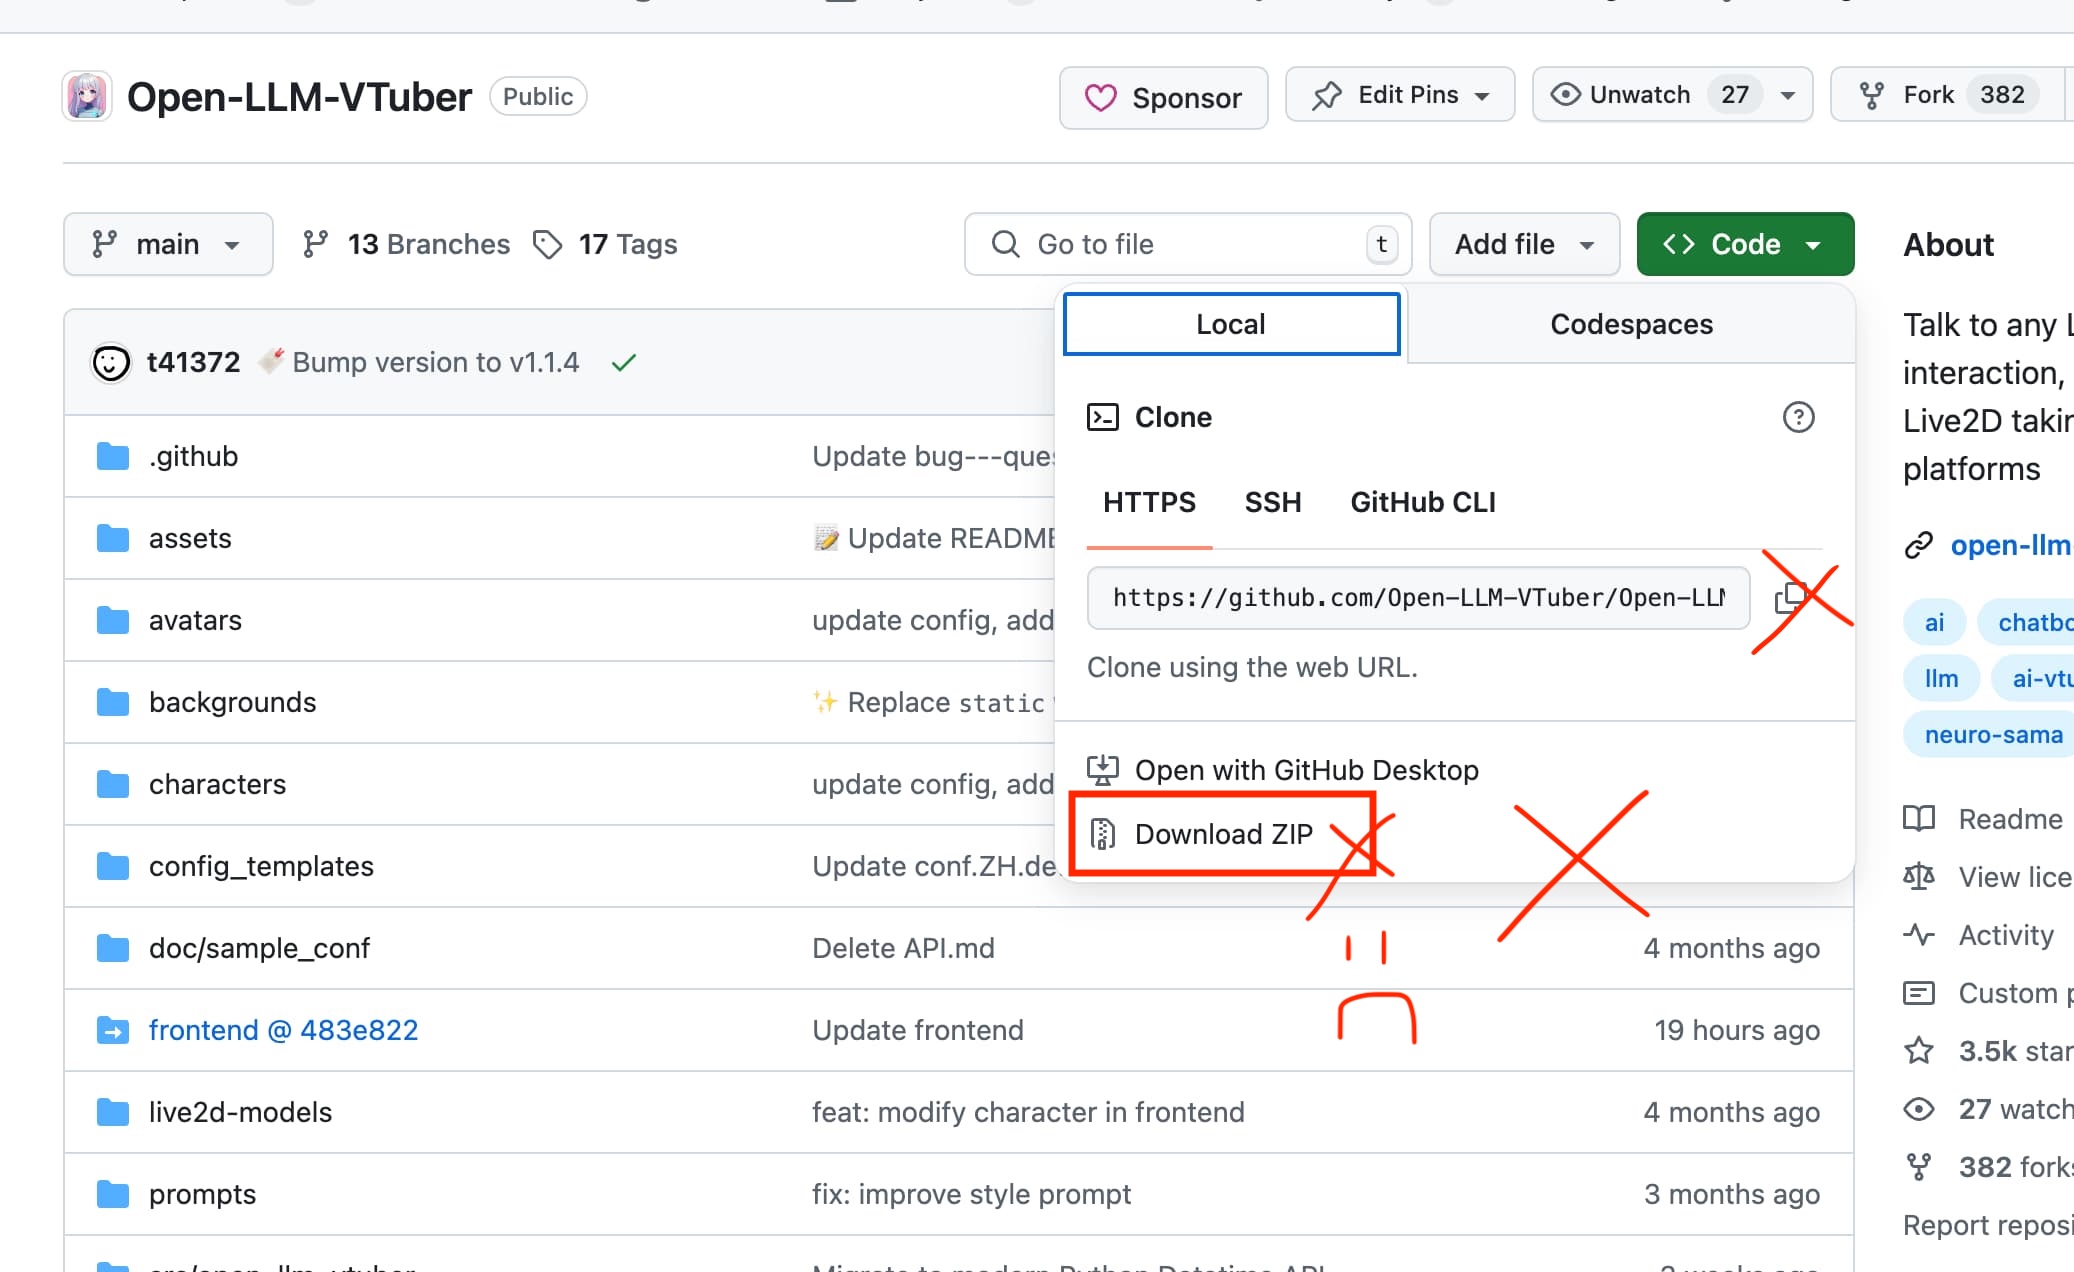
Please DO NOT download the ZIP file from the green "Code" button on the GitHub main page, nor use the clone command provided there to get the project code.
Why can't I download the ZIP file from the Code button?
- The ZIP file obtained from the Code button does not contain Git information. This is generated by GitHub, and I have no control over it.
- The front end of this project is linked by submodules. If you download the ZIP file from this button, you will not get the front-end code, which will cause the browser to display a "Detail Not Found" error.
- The update mechanism of this project relies on Git, so missing Git information will prevent you from using the update function.
2. Install Project Dependencies
⚠️ If you are not located in mainland China, don't use mirror sources.
Users in mainland China can configure mirrors for Python and pip to improve download speeds. Here, we'll set up the Alibaba mirror.
Details
Please add the following content to the bottom of the pyproject.toml file in your project directory.
[[tool.uv.index]]
url = "https://mirrors.aliyun.com/pypi/simple"
default = true
Some other mirror sources (modify the url part above):
- Tencent mirror: https://mirrors.cloud.tencent.com/pypi/simple/
- USTC mirror: https://pypi.mirrors.ustc.edu.cn/simple
- Tsinghua mirror (seems to have some issues with our project): https://mirrors.tuna.tsinghua.edu.cn/pypi/web/simple
- Huawei mirror: https://repo.huaweicloud.com/repository/pypi/simple
- Baidu mirror: https://mirror.baidu.com/pypi/simple
Some mirrors may be unstable at times. If you encounter issues, try switching to a different mirror. Don't enable proxy when using mirror sources.
Verify that uv is installed correctly:
uv --version
Create the environment and install dependencies:
# Make sure you run this command in the project root directory
uv sync
# This command will create a `.venv` virtual environment
For users in mainland China who encountered a problem at this step, please enable your proxy and try again.
Next, let's run the main program to generate the configuration file.
uv run run_server.py
Then press Ctrl + C to exit the program.
Starting from version v1.1.0, the conf.yaml file may not automatically appear in the project directory. Please copy the conf.default.yaml or conf.ZH.default.yaml file from the config_templates directory to the project root directory and rename it to conf.yaml.
Alternatively, you can generate the configuration file by running the main program uv run run_server.py and exiting with Ctrl + C (this method is not recommended). Please note that the exit operation needs to be performed promptly, otherwise the program will start downloading model files (exiting at this point may prevent startup next time, the solution is to delete all files under models/).
3. Configure LLM
We will use Ollama as an example for configuration. For other options, please refer to the LLM Configuration Guide.
If you do not want to use Ollama / encounter difficult issues with Ollama configuration, this project also supports:
- OpenAI Compatible API
- OpenAI Official API
- Claude
- Gemini
- Mistral
- Zhipu AI
- DeepSeek
- LM Studio (similar to Ollama, easier to use)
- vLLM (better performance, more complex configuration)
- llama.cpp (directly runs .gguf format models)
- And more (most LLM inference backends and APIs support OpenAI format and can be directly integrated into this project)
For more information, refer to the LLM Configuration Guide.
Install Ollama
- Download and install from the Ollama Official Website
- Verify installation:
ollama --version
- Download and run a model (using
qwen2.5:latestas an example):
ollama run qwen2.5:latest
# After successful execution, you can directly chat with qwen2.5:latest
# You can exit the chat interface (Ctrl/Command + D), but do not close the command line
- View installed models:
ollama list
# NAME                ID              SIZE      MODIFIED
# qwen2.5:latest      845dbda0ea48    4.7 GB    2 minutes ago
When looking for model names, use the ollama list command to check the models downloaded in ollama, and directly copy and paste the model name into the model option to avoid issues like incorrect model names, full-width colons, or spaces.
When selecting a model, consider your GPU memory capacity and computing power. If the model file size exceeds the GPU memory capacity, the model will be forced to use CPU computation, which is very slow. Additionally, the smaller the model's parameter count, the lower the conversation latency. If you want to reduce conversation latency, choose a model with a lower parameter count.
Modify Configuration File
If you don't have a conf.yaml file in your project directory, please run the main program uv run run_server.py once to generate the configuration file, then exit.
Edit conf.yaml:
- Set
llm_providerunderbasic_memory_agenttoollama_llm - Adjust the settings under
ollama_llmin thellm_configssection:base_urlcan remain default for local operation, no need to modify.- Set
modelto the model you are using, such asqwen2.5:latestused in this guide.
ollama_llm:
  base_url: http://localhost:11434  # Keep default for local operation
  model: qwen2.5:latest            # Model name obtained from ollama list
  temperature: 0.7                 # Controls response randomness, higher values are more random (0~1)
For detailed explanations of the configuration file, refer to User Guide/Configuration File.
4. Configure Other Modules
The default configuration in this project's conf.yaml uses sherpa-onnx-asr (SenseVoiceSmall) and edgeTTS, and translation is disabled by default, so you do not need to make modifications.
Alternatively, you can refer to the ASR Configuration Guide, TTS Configuration Guide, and Translator Configuration Guide for modifications.
5. Start the Project
Run the backend service:
uv run run_server.py
# The first run may take longer as some models are downloaded.
After successful execution, visit http://localhost:12393 to open the web interface.
If you prefer an Electron application (window mode + desktop mode), you can download the corresponding platform Electron client from Open-LLM-VTuber-Web Releases, which can be used directly while the backend service is running. You may encounter security warnings due to the lack of code signing - please check Mode Introduction for details and solutions.
For more information about the frontend, refer to the Frontend Guide
Next Step:
- Common Issues
- Long-Term Memory (Letta)
- Desktop Pet Mode
- Modifying AI Character Settings (Prompt)
- AI Group Chat (currently lacking documentation)
- Modify Live2D Model
- Modify LLM (Large Language Model)
- Modify TTS Model (AI's Voice Model)
- Modify ASR Model (Speech Recognition Model)
- Join Discussions, Join the Community
- Contribute to Development
Long-term memory?
In version 1.2.0, long-term memory implementation based on Letta (also known as MemGPT) was added thanks to the effort of (PR #179). Your AI companion can get long term memory powered by Letta, though this will increase conversation latency.
For more details, see the Agent -> Letta Agent page
If you don't have a conf.yaml file in your project directory
Starting from version v1.1.0, the conf.yaml file might not automatically appear in the project directory. Please run the main program uv run run_server.py once to generate the configuration file.
If you encounter the Error calling the chat endpoint... error, please check:
-
Whether http://localhost:11434/ is accessible. If not, it may be because
ollama rundid not run successfully, or the command line was closed after successful execution. -
If the error message indicates
Model not found, try pulling it..., useollama listto check the installed model names and ensure the model name in the configuration file matches the list exactly. -
If your proxy software does not bypass local addresses, Ollama will not be able to connect. Try temporarily disabling the proxy or refer to the previous section to set up proxy bypass for local addresses.
Regarding this issue, we have a detailed explanation in FAQ -> #What-to-do-if-I-encounter-the-error-calling-the-chat-endpoint-error